
How to Recolor a Selected Area in an Image
A full-photo filter changes every pixel. Recoloring one petal, one logo mark, or one shirt does not. ROCKIMG’s free Recolor Image tool lets you click that region, paint a new color, and download a PNG. The file stays in your browser.
Published on: October 13, 2026

What recoloring a selected area means
You mark one connected color region, then replace only those pixels. The rest of the picture stays as it was.
That is a different job from turning the whole photo black and white, and a different job from sampling a single pixel. The mark has to follow the shape. On an icon, the shape is a petal or a badge. On a photo, it might be a jacket, a car, or a wall, as long as that surface is close to one color and touches itself.
The download is a normal PNG. You can drop it into a deck, a product mock, or another editor. Refreshing the tool clears the picture, so save the file before you leave the tab.
Watch the short demo
The pass takes a few clicks: load a picture, click the area, set the new color, download.
This walkthrough is the same flow as the RockIMG video How to rapidly alter the color of selected areas in an image?
How a click becomes a selection
Smart select starts at the pixel you click and spreads only through neighbors that are close to that color.
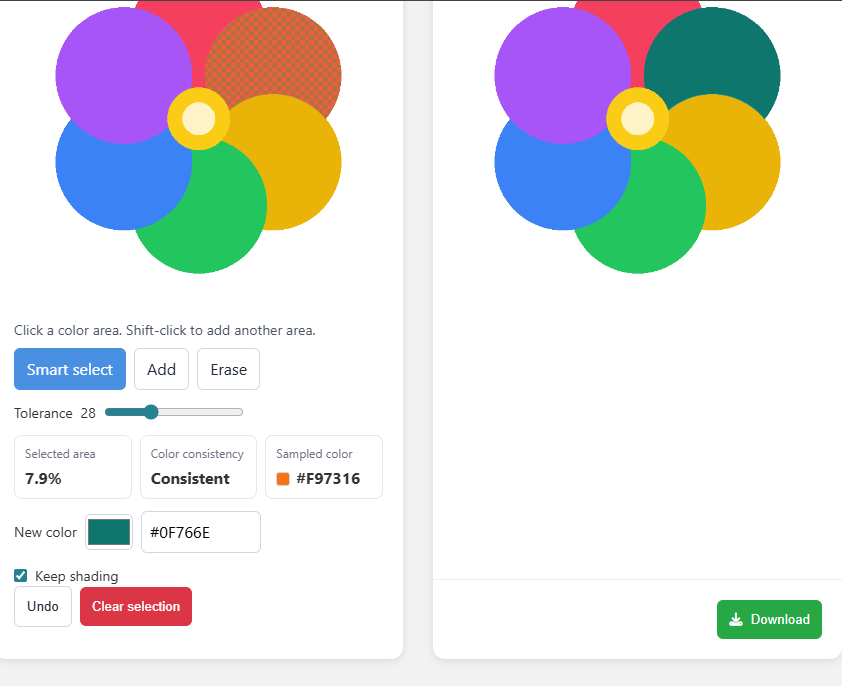
A red petal beside an orange one does not come along, because the colors diverge and the flood stops. Transparent pixels are skipped, so a checkerboard background behind a PNG icon is not treated as part of the object. The overlay on the workshop canvas is a pink-and-teal checker. It shows the mask. It is not the new color.
Under the canvas, Selected area is the share of the picture inside the mask. Sampled color is the dominant color inside that mask, not always the exact pixel under the cursor. Color consistency reads Consistent when the region is nearly one hue, Usable when it varies a little, and Mixed colors when the click grabbed too many hues. Mixed is a hint to lower the tolerance or erase the spill.


How to recolor part of an image
Upload, click the region, set the color, then download. The result updates while you edit, so there is no separate Create step.
Step 1: Upload a JPG, PNG, WebP, or GIF
Drop the file on the upload area or click to choose it. The limit is 15 MB. A picture whose long side is over 1600 pixels is reduced before you edit, and a note appears when that happens. A GIF uses the first frame only. HEIC and other camera formats need a conversion pass before they open here.
Icons, flat illustrations, and screenshots with solid fills behave best. A busy street photo will select a patch, not a whole object, unless that object is a fairly even color.
Step 2: Click the color with Smart select
Smart select is the default tool. Click inside the region you want to change. On the flower above, that click landed on the orange petal and selected about 7.9% of the canvas, marked Consistent, sampled as #F97316.
Hold Shift and click a second region if you want both in the same mask. A plain click replaces the previous selection. Undo steps back. Clear selection drops the mask and the result returns to the original pixels.
Step 3: Tighten the edges
Tolerance starts at 28 and runs from 4 to 80. A low value hugs the clicked color. A high value reaches into nearby shades and can leak across a soft shadow or a JPEG fringe. Drag it and the same click point is recalculated, so you can watch the checker grow or shrink without clicking again.
Switch to Add or Erase when the flood is almost right. Those tools use the Brush slider, measured in screen pixels, and paint the mask directly. Add fills holes inside a letter or a highlight. Erase pulls the mask off a neighboring object that barely crossed the tolerance line. The status line under the canvas tells you which mode is active.
Step 4: Pick the new color
New color is a swatch plus a HEX field. Type a full code such as #0F766E, or use the picker. The first successful selection suggests a contrasting color so the change is obvious. After you edit the HEX or the picker, later clicks keep your color instead of inventing a new one.
Leave Keep shading on when the region has highlights or folds. Each selected pixel is scaled by its own brightness, so a light spot stays light and a crease stays dark, within a limited range. Turn it off when you want a flat fill, which is what a solid icon petal looks like either way. The flower result is flat because the source petal was flat.
Step 5: Download the PNG
Download saves the result panel, not the checker overlay. The file name is recolor-image.png. Unselected pixels, including transparency, are copied through. If nothing is selected, the download is the working image, which may already be the reduced size from step 1.
When to keep the shading
Keep shading when the surface has light and dark in it. Turn it off when you want one flat chip of color.
A product photo of a ceramic mug has a highlight along the rim and a darker side. Recoloring that mug from white to blue with shading on keeps the rim bright and the side in shadow, so it still reads as a mug. The same mug with shading off becomes a sticker-like blue shape. Both are valid. The checkbox is the switch.
Very dark pixels stay dark, and very light pixels stay light, but the scale is capped so a near-white highlight does not blow out into a different hue family. If a metallic logo needs a true gold gradient you painted by hand, this tool will not rebuild that gradient. It recolors the pixels that are already there.
Tip: If Color consistency says Mixed colors, the mask probably crossed two objects. Lower Tolerance, or Erase the spill, before you trust the new color.
Icons, photos, and messy edges
Flat shapes select cleanly. Photos and soft gradients need tolerance plus the brush.
- Icons and simple illustrations. Click the fill. If a thin outline is a different color, it stays unless you Add it with the brush. Anti-aliased edges against white are usually pulled in, so you do not get a bright halo of the old color.
- Screenshots and UI mockups. Solid buttons and badges work. Text on top of a button is a different color, so the letters stay unless you paint them in. That is often what you want when you are recoloring a button behind the label.
- Photos. A blue shirt on a blue couch will merge if the colors are close and the pixels touch. Raise the click point onto the clearest part of the shirt, drop Tolerance, then Erase the couch. Shift-click a second patch of the same shirt if a fold broke the connection.
- JPEG blocks and heavy blur. The edge is already a blend of both colors. Expect to Erase a pixel or two. A crisp PNG icon will not ask for that.
Large files are scaled so the long side is at most 1600 pixels. If you need a print-size original, do the color test here, then repeat the same HEX in your layout app on the full file. The browser edit is the decision, not a 16-bit master.
A single pixel is a different task
Recolor Image changes a region. It does not copy one pixel’s code, and it does not invert the whole frame.
Use Get Image Color when you only need the HEX under the cursor, a short history, or the dominant colors of the whole picture. Use Invert Image when every pixel should flip, not one object. Recolor Image sits between those two: one area, one new color, the rest untouched.
A practical order: sample the brand HEX with Get Image Color if you already have a reference, paste that code into New color, then click the object you want to match.
Click a color area, replace it, and download the PNG. Nothing is uploaded.
Open Recolor Image